Tuesday, December 24, 2013

No Chance for Christmas Presents without Sewing :)

Ok, I thought, this will be a christmas without sewn present, but I couldn´t resist. We are going to give all 5 cousins (incl. my daughter) a gift coupon to go to a spectacular swimming pool thing called Tropical Island. It was to simple to put the coupons into a normal envelope, so I made 5 secret pocket envelopes from Michellepatterns. They are fast to sew and so sweet. Now I am happy, because I have a nice wrapping.

Na gut, ich dachte, dieses Weihnachten gibt's nix Genähtes, aber ich konnte nicht widerstehen. Wir werden den 5 Cousinen / Cousin (inkl. Meiner Tochter) einen Gutschein für's Tropical Island schenken. Es war zu einfach, die Gutscheine in normale Papierumschläge zu stecken, also hab ich 5 Secret Pocket Envelopes von Michellepatterns genäht. Die sind schnell genäht und so süß. Jetzt bin ich echt froh, weil ich eine schöne Verpackung habe.


I wish you a wonderful Christmas!!!

Ich wünsch Euch frohe Weihnachten!!!

Aylin....

PS: linked with Creadienstag...

Friday, December 20, 2013

Playing with Oakshotts


This time I´m the lucky one who got the chance to make something beautiful with a F8-bundle from Oakshotts called Italy. Thank you so much Lynne - Lily´s Quilt, that I can be a guest on your blog today :).

Dieses Mal bin ich die Glückliche, die mit einem Fat-Eight-Päckchen von Oakshott Stoffen der Serie Italy rumspielen darf. Vielen lieben Dank  Lynne - Lily´s Quilt, dass ich heute Gast auf Deinem Blog sein kann :).

When I saw these shimmering colors I knew exactly what I wanted to do with them: a traditional block called spiderlegs in a modern way with text-fabric in the center framed with these wonderful soft colored Oakshotts. I was so excited to get the fabric bundle!

Als ich die schimmernden Farben sah, wusste ich genau, was ich machen wollten: einen traditionellen Block, der auch Spiderlegs - Spinnenbeine genannt wird. Ich wollte ihn modern interpretieren mit Textstoffen als Spinnenbeine und Oakshotts als Rahmen. Ich war schon ein wenig aufgeregt, da ich noch nie Oakshotts in der Hand hatte - sehr weich und viel dünner als ich erwartet habe.
Madrona Road for the binding...

Cosy backside


Here is my way to make spiderlegs-blocks:

Und hier, wie ihr Spiderlegs nähen könnt:
If you use a F8 like me, you have to cut very carefully, because you will need all your fabric and this is the way you are going to cut:

Wenn ihr auch Fat Eights benutzt, dann müsst ihr echt vorsichtig zuschneiden, da ihr nahezu den gesamten Stoff braucht:
For the Background (fabric 1) you need 1 rectangle 7x14 inch. Then cut 1 5/8 inch-stripes from the rest. The thinner stripe above the rectangle is your emergency piece of fabric in case you have to correct something. If you have some more fabric, you should cut the stripes wider to make the sewing on the paper easier.

Für den Hintergrund (Stoff 1) braucht ihr 1 Rechteck 7x14 Inch. Dann schneidet ihr aus dem verbleibenden Stoff Streifen mit der Breite von 1 5/8 Inch. Den dünneren Streifen hebt ihr euch als Reserve auf. Wenn ihr mehr Stoff habt, schneidet den Streifen großzügiger, das macht das Nähen auf Papier deutlich einfacher.
Cut your rectangle into 2 7x7 Inch squares and cut from one corner to the other to get four HSTs.

Schneidet das Rechteck in 2 7x7 Inch Quadrate und diese in 4 HST´s.
Then cut a 2,5x2,5 inch square from the middle fabric (fabric 2) and some stripes of 1,5 inch.

Dann kommt der Mittelstoff (Stoff 2): schneidet hier ein 2,5x2,5 Inch Quadrate und 1,5 Inch breite Streifen.
Now you need the paper piecing pattern for the spiderlegs. Print it 4 times per block.

Nun braucht ihr die paper piecing Vorlage für die Spinnenbeine. Druckt jeweils 4 pro Block aus.
When I have longer or bigger parts on a pp-pattern, I fix them before sewing the other parts on it, so they can not slip away. You can also use glue, but I was a bit afraid to ruin my soft Oakshotts.

Wenn ich längere oder größere Stücke auf pp-Vorlagen habe, fixiere ich sie, bevor ich die anderen Teil ran nähe, damit nichts verrutscht. Ihr könnt das fest kleben, aber da ich hatte ich ein wenig Angst die weichen Oakshotts zu ruinieren.
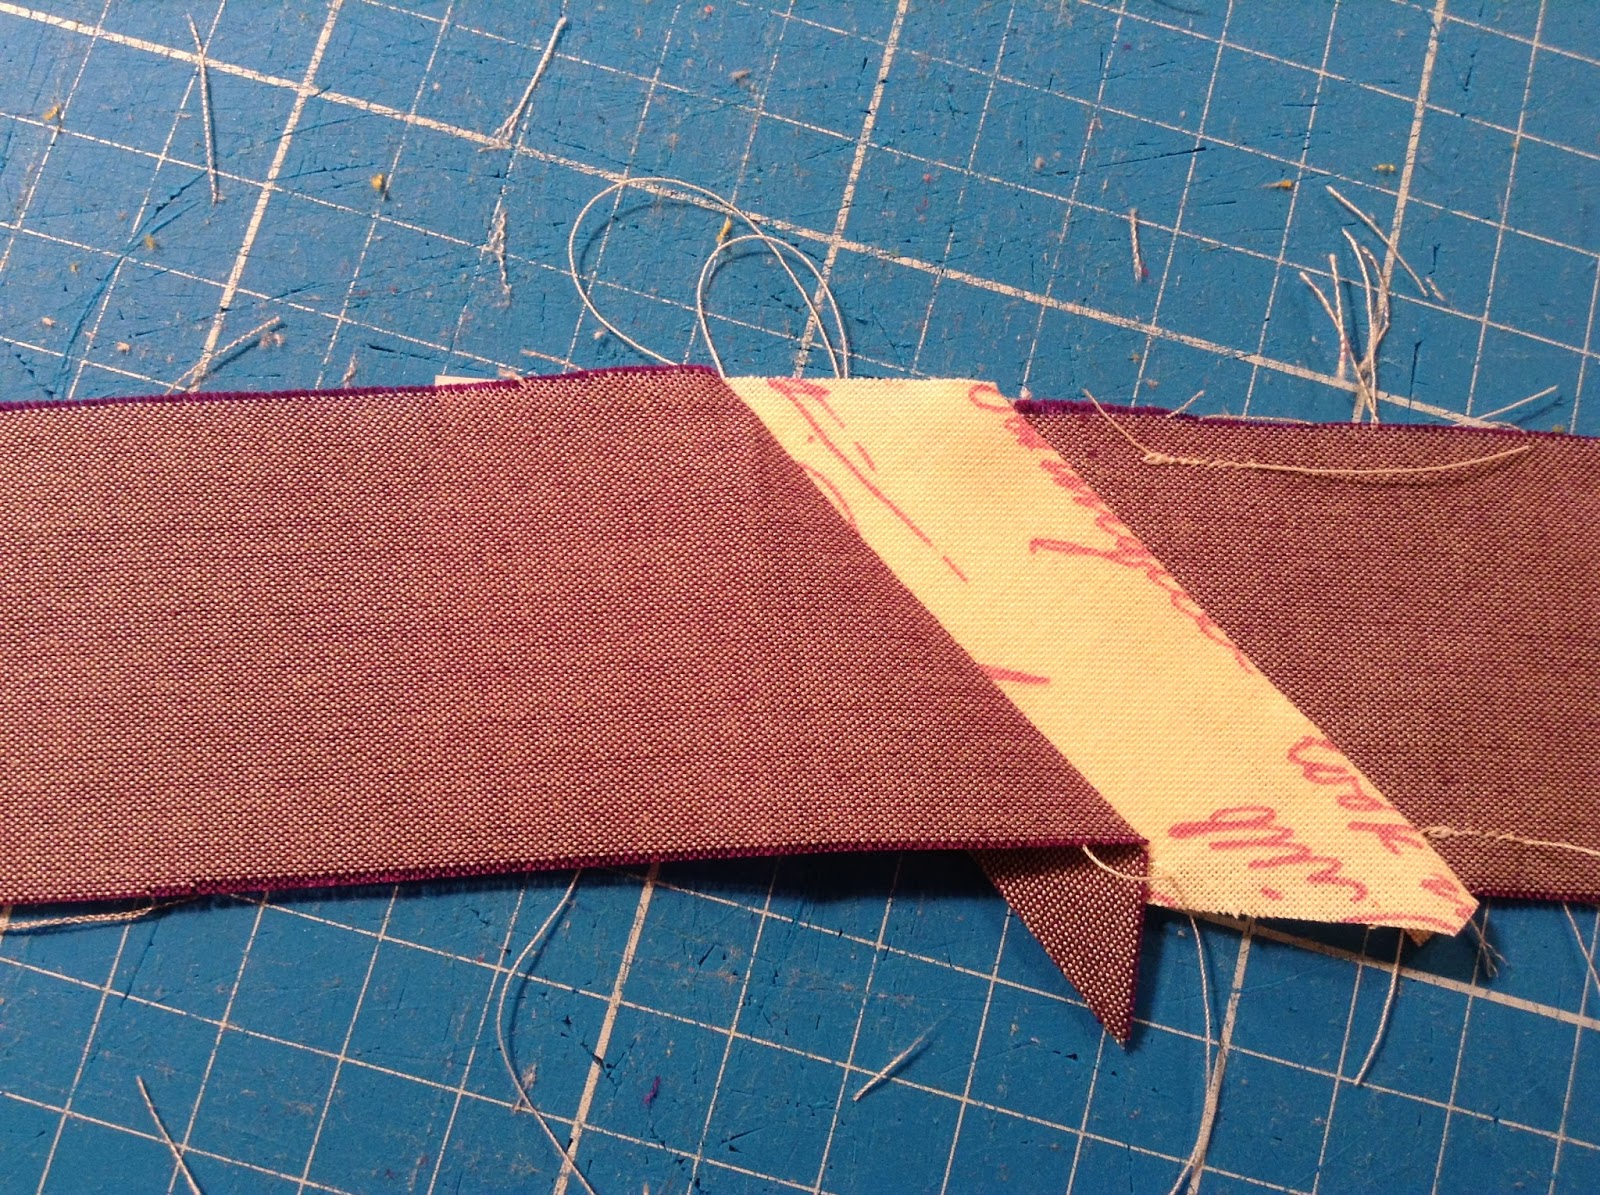
Then fold the first line and cut a ¼ seam allowance line on fabric 1. Now you see exactly, where to locate fabric 2. Do the same with the other stripes until your pp-pattern is finished. Be careful, if you have these 1 5/8 stripes, because you have to place those stripes very well, to cover the whole paper!

Dann faltet die erste Linie und schneidet inkl. 1/4 Inch Nahtzugabe den restlichen Stoff 1 ab. Jetzt seht ihr genau, wo der Stoff 2 anzulegen ist. So wiederholt ihr das ganze, bis die pp-Vorlage fertig genäht ist. Seid vorsichtig, wenn ihr mit 1,5/8 Inch Streifen arbeitet, da ihr wenig Luft für die Seiten habt!


Continue until you have eight spiderlegs. Sew two of them together, then remove the paper and iron the seams open.

Das wiederholt ihr 8 mal. Näht dann jeweils 2 Spinnenbeine zusammen und entfernt dann das Papier und bügelt die Naht auseinander.


Now sew the triangles on both sides of one spiderleg and repeat this with a second spiderleg. Spiderlegs 3 and 4 will be sewn on the sides of the middle square.

Jetzt werden Dreiecke an beide Seiten eines Spinnenbeins genäht und das ganze wird für ein zweites wiederholt. Spinnenbeine 3 und 4 werden an das kleine Quadrat von Stoff 2 genäht.

The last step will be, to sew the triangles and the stripe together to get a square on Point.

Als letzten Schritt müsst ihr noch die beiden großen Dreiecke und den Streifen zusammennähen.
I had 12 F8´s in 12 different colors and so I made 12 blocks.

Ich hatte 12 Fat Eights in 12 unterschiedlichen Farben und habe daher auch 12 Blöcke genäht.
Hope to see some spiderlegs from you too :)

Hoffe, ich seh auch ein paar Spinnenbeine von Euch :)

Have a great time!

Euch eine schöne Zeit!

Aylin ...

Sunday, December 15, 2013

Sew Mama Sew Giveaway - Winner


http://www.sewmamasew.com/
Thank you so much for your wonderful comments on my Give-Away. You can find so many great links to fantastic tutorials there

Vielen lieben Dank für die wunderbaren Kommentare zu meinem Give Away hier könnt ihr so viele tolle Links zu Anleitungen finden.
And the winner of this QAYG Endless Zipper Pouch is....

Und die Gewinnerin dieser QAYG Endlosreißverschlusstasche ist..

Congratulations to you Sofen - Herzlichen Glückwunsch, Sofen!

Have a great Weekend... / Habt ein schönes Restwochenende...
Aylin...

Friday, December 13, 2013

Beatnik Waist Bag

Again I had the chance to test a pattern for Sara from Sewsweetness. I really love her bags and I still wait for her book to come to my house. Amazon says it will be here after christmas.


Ich hatte mal wieder die Chance, ein Muster von Sara - Sewsweetness zu testen ich liebe ihre Taschen und warte immer noch darauf, dass ihr Buch bei mir zu Hause eintrifft. Laut Amazon soll es nach Weihnachten endlich kommen.


You can have a look at her blog to see how this bag looks with other fabrics. I used one of my favorite fabrics: it's a linen from Marie Jacoby and it's called Berlin Map. It's funny, because she is a Berlin designer, her fabric is Japanese linen and I bought it in the USA - very international like Berlin itself.

Auf ihrem Blog könnt ihr euch diese Tasche mit anderen Stoffen anschauen. Ich habe hier einen meiner Lieblingsstoffe von Marie Jacoby verarbeitet, er heißt Berlin Map. Es ist schon lustig, da die Designerin Berlinerin ist, der Stoff japanischen Leinen ist und ich ihn in den USA gekauft habe - sehr international, wie Berlin eben.

The waistbag has a gorgeous size and is not complicated. The pockets on the front and back are great details.

Die Hüfttasche hat eine perfekte Größe und ist nicht sehr kompliziert. Die Taschen vorne und hinten sind ein tolle Details.
                   
Go for it :-)

Los geht's :-)

Have a great weekend.../ Euch ein schönes Wochenende...

Aylin...

Tuesday, December 10, 2013

Endless Zipper Pouch Tutorial - Sew Mama Sew Giveaway!

Hello and welcome if you are visiting through Sew Mama Sew Giveaway Day or Creadienstag! Of course all the others are welcome too ;-). If you are new here, my name is Aylin and this is my little blog. Just have a look through my posts, if you are interested. You are very welcome to come back :)!

Hallo und herzlich Willkommen, wenn ihr über den Sew Mama Sew Giveaway Day oder Creadienstag bei mir gelandet seit - sonst natürlich auch ;-)! Falls ihr neu seid: ich bin Aylin und das ist mein kleiner Blog. Schaut doch einfach mal durch meine Posts, falls es euch interessiert. Ihr seid herzlich Willkommen, wieder vorbei zu schauen :)!

So this is what I am giving away and what you can sew yourself almost with the tutorial: an Endless Zipper QAYG Pouch!

Das gibt´s bei mir und das ist, was du fast mit der Anleitung selber nähen kannst: ein Endlosreißverschluss-QAYG-Täschchen!


How to enter:

 1.  Just leave me a comment and say hi or if you like, tell me one of your favorite tutorials! I am collecting links to tutorials of others on my blog too - see here.
 2. Follower will get another chance :)
 3. Follow me on Instagram Nilya2001


Wie könnt ihr mitmachen:

1. Hinterlasst einfach einen Kommentar und sagt Hallo oder schreibt eine Eurer Lieblingsanleitungen auf. Ich sammle hier links zu Anleitungen auf meinem Blog.
2. Follower bekommen eine zweite Chance :)
3. Folge mir auf Instagram Nilya2001

The Winner:

I will choose the winner on December 14th randomly.  Make sure that I have a way to contact you so that I can let you know that you won :).

Der Gewinner:

Ich werde den Gewinner per Zufallsgenerator am 14. Dezember auslosen. Bitte stellt sicher, dass ich euch im Falle des Gewinnes auch erreichen kann :).

http://www.sewmamasew.com/
I also ship international! 
 
Tutorial endless zipper pouch / Anleitung Endlosreißverschluss-Täschchen :
 
In case you don´t win, just make your own endless zipper pouch. Just let me tell you, that this is of course nothing new, but I was asked if I could write down a quick tutorial about this endless-zipper-thing.

Falls ihr nicht gewonnen habt, könnt ihr euch eure eigene Endlosreißverschluss-Tasche machen. Lasst mich nur vorweg klarstellen, dass diese Methode nichts Neues ist, aber ich von einigen gefragt wurde, ob ich da mal schnell eine Anleitung zu dieser Endlosreißverschluss-Sache schreiben könnte.
 
You have to think about the size of your pouch - I show you the tutorial with the size of mine, but you can make it with any size:

Ihr müsst Euch Gedanken machen über eure gewünschte Täschchengröße - die Anleitung wir in einer Größe durchgeführt und kann auf jeder übertragen werden: 
Material:
 
main fabric / Hauptstoff: (can be Patchwork, QAYG or just plane fabric) 2 panels 9x8 inch or 1 panel 17,5 x 8 Inch
(kann gepatched, QAYG oder einfach nur Stoff sein) 2 Panele 9x9 inch oder 1 Panel 17,5 x 9 Inch

lining fabric / Innenfutter: 1 panel 17,5 x 8 Inch

batting / Innenfutter: 2 panels 9x8 inch or 1 panel 17,5 x 8 Inch

end endless zipper and zipper pull / Endlosreißverschluss und Schieber: 17,5 Inch + 6 inch = 22,5 Inch - it should be always 6 Inch longer than any size your pouch is going to be - better longer than shorter.
17,5 Inch + 6 inch = 22,5 inch - er sollte immer 6 Inch länger sein als die obere Seitenlänge, egal wir groß die Tasche sein soll - lieber länger statt kürzer.

Seam allowance / Nahtzugabe: 1/4 inch
 
In my case I ´ve chosen the option of making 2 9x9 panels, because I like it better for QAYG. Those 2 panels will be sewn together to get one panel 17,5 x 9 inch.

In meinem Fall habe ich die 2-Panel-Variante gewählt, da ich QAYG nicht gern mit großen Teilen nähe. Die beiden Panele werden dann an der Seite zusammen genäht und ergeben dann ein 17,5 x 9 Inch Panel.  
Mark the middle of the zipper and the middle of your 17,5 inch wide panel. Mark also inch on each of the ends of the panel. Then pin the middle of the panel and zipper together and pin the ends of the zipper foating down at the 1 Inch mark. Sew the zipper very close on the edge of the main fabric to fix the zipper.
 
Markiert die Mitte des Reißverschlusses und die Mitte des Panels. Außerdem noch an beiden Enden des Panels jeweils 1 Inch vom Rand markieren. Dann Reißverschluss in der Mitte fest stecken und an den beiden 1 Inch-Rändern die Reißverschlussenden nach unten auslaufen lassen. Der Reißverschluss wird dicht am Rand angenäht und somit fixiert.
Then lay your lining and main fabric right side to right side and sew them together.

Dann werden Innen- und Außenstoff rechts auf rechts gelegt und am Reißverschluss zusammen genäht.
Sew the sides together, be careful, that the zipper ends are inside and will not be sewn. Close your bottom as you always do with pouches... this is how make it....

Die Seitennaht schließen und damit aufpassen, dass die Reißverschlussenden nicht in die Naht rutschen. Den Boden wie immer beim Täschchen schließen... hier seht ihr, wie ich das mache...
Topstich the pouch around the zipper.

Den oberen Rand absteppen.
Put in the zipper pull (hope this is the right worde) and sew the end of it, so you cannot pull it out by accident. There lots of ways to do so, so try to find your way... you tube helps here too. Close the zipper to see, if the pull is on the right place, if not, take the pull out and try it again!

Den Schieber reinfummeln und am Ende zu nähen, damit der Schieber nicht wieder rausrutschen kann. Es gibt unterschiedliche Wege, den Schieber einzuschieben, versucht euren Weg zu finden.... you tube kann hier helfen. Den Reißverschluss schließen und schauen, ob der Schieber am Ende gerade sitzt, sonst nochmal versuchen!
Sew a little zipper-holder and pull it over the zipper end and sew it. Lots of ways to do the zipper end... this is my way... Mine is 2x3 Inch.

Am Ende braucht man noch ein Endstück für den Reißverschluss. Es gibt viele Wege dafür, hier meiner...Meins ist 2*3 Inch groß.
Here you go with your finished endless zipper pouch :-).

Und da habt ihr eurer fertiges Endlosreißverschluss-Täschchen :).

Thank´s for stopping by... / Danke für´s Vorbeischauen

Aylin ...

PS: linked with Sew Mama Sew and Creadienstag