Monday, February 24, 2014

I have a bad cough since Thursday last week so there was no chance to sew at all :(. But to console me, I got wonderful fabrics I ordered directly at Anna Maria Horner. It is the first time, that I ordered the whole package with all fabrics of one line and it looks so beautiful: it´s her new line true colors, yummy.

Ich habe seit Donnerstag einen echt schlimmen Husten, so dass ich keine Chance hatte, auch nur irgendwas zu nähen :(, aber um mich zu trösten, habe ich wunderschöne Stoffe bekommen, die ich direkt bei Anna Maria Horner bestellt habe. Das erste Mal, dass ich eine ganze Linie gekauft habe: True Colors, sooo schön!

What did you do the last week? Show us your lovely projects.
Was hast du die letzte Woche gemacht? Zeig uns Deine tollen Projekte.


You will find the same Linky Party on suleons blog.
Die gleiche Linky Party findet ihr auch auf Suleons Blog.


Button-Code für euren Blog / for your blog:


<a href="http://aylin-nilya.blogspot.com/">


<img border="0" src="http://3.bp.blogspot.com/-JY2v9CKQW-k/UtO90cks4pI/AAAAAAAAA1M/9oPJe72-rnk/s1600/MM.JPG" /></a>


Thank´s for stopping by... / Danke für´s Vorbeischauen...

Aylin


Monday, February 17, 2014

MondayMakers meet Infinity Scarf


I have to confess, that I made this infinity scarf some weeks ago, but only could give it to a friend yesterday. So I wanted to Keep it a secret :). This will not be my last one. I used "WISH"  a voile from V.Wells and a very thin cotton (my dictioinary says gossamar). I have some cut to make more this Weekend.


Ich muss gestehen, dass ich den Endlosschal schon vor einigen Wochen genäht habe, aber ich konnte ihn meiner Freundin erst gestern überreichen. Ich wollte es doch geheim halten :). Das war aber garantiert nicht mein letzter. Ich habe "Wish" von V. Wells auf der einen Seite benutzt - ein super softer Voile . und Gaze auf der anderen Seite. Ich hab schon vorgeschnitten, um am Wochenende mehr zu machen.


What did you do the last week? Show us your lovely projects.


Was hast du die letzte Woche gemacht? Zeig uns Deine tollen Projekte.


You will find the same Linky Party on suleons blog.


Die gleiche Linky Party findet ihr auch auf Suleons Blog.


Button-Code für euren Blog / for your blog:


<a href="http://aylin-nilya.blogspot.com/">

<img border="0" src="http://3.bp.blogspot.com/-JY2v9CKQW-k/UtO90cks4pI/AAAAAAAAA1M/9oPJe72-rnk/s1600/MM.JPG" /></a>


Thank´s for stopping by... / Danke für´s Vorbeischauen...

Aylin

PS: linke with WIP Wednesday


Tuesday, February 11, 2014

The Magic off EPP - EPP QAL


Welcome to the magic of EPP. Leanne - she can quilt asked me, if I would make a tutorial as a guest post on her blog on the 7th of January this year. I am so thankful, that she asked me, it was so much fun to write this. It´s a very long post, so take a cup of tea or coffee and I hope you enjoy it.

Willkommen zur Magie von EPP. Leanne von she can quilt fragte mich, ob ich einen Gastpost auf ihrem Blog schreiben würde (erschienen am 7.1.2014). Ich bin so dankbar, dass sie mich gefragt hat, denn es hat unglaublich Spaß gemacht, diesen "Artikel" zu schreiben. Es ist ein langer Post, also nun einen Pott Tee oder Kaffee geholt und lesen, ich hoffe, er gefällt euch auch.
she can quilt
I thought this is the right moment for an EPP-QAL. There will be no rules, just starting new projects together or finishing WIP´s or UFO´s. Get inspired and motivated to start or go on :). Here you will find the flickr-group to share all your pictures, questions and tips.


Ich dachte, das wäre der richte Zeitpunkt einen EPP-QAL zu starten. Es gibt keine Regeln, einfach nur neue Projekte beginnen oder alte beenden. Lasst euch inspirieren und motivieren beim Anfang oder beim Beenden :). Hier findet ihr die flickr-Gruppe, um Bilder, Tipps und Fragen zu teilen.


English Paper Piecing (EPP) is an old traditional technique to sew parts together by hand where the parts are reinforced with paper-templates.


English Paper Piecing (EPP) ist eine alte traditionelle Methode, um Teile mit der Hand aneinander zu nähen, wobei die Teile zum  Zusammennähen mit Papiervorlagen verstärkt werden.


Why do we sew by hand in times of modern machines? What's the magic about EPP? Well, I can tell you why I love EPP. This is the most relaxing way of sewing to me. You can take your project or parts of it with you where ever you go and do some stitches. Even if you only sew one seam, it is worth to take it with you. I do EPP sometimes in the car while waiting for my daughter picking her up from basketball exercises. It is a good way to kill the time.


Warum nähen wir mit der Hand in Zeiten modernster Maschinen? Was ist die Magie um´s EPP? Nun, ich kann euch erzählen, warum ich EPP liebe. Das ist die beste Art zu Entspannen und gleichzeitig etwas Kreatives zu erschaffen. Man kann sein Projekt überall hin mitnehmen und ein paar Stiche nähen. Auch wenn man nur eine Naht zusammennäht, war es schon wert, es mitgenommen zu haben. Ich nähe EPP oft auch im Auto beim Warten, bis meine Tochter Trainingsschluss hat. Es ist ein genialer Zeitkiller.
 
And you see your project growing slowly and getting more and more beautiful. Maybe it's even a kind of therapy or meditation - it's just you and your little project in your hand. I find myself pausing from time to time and looking on my sewing or even stroking it. Well, seams as if I am a sewing nerd :).


Und man sieht das Projekt langsam wachsen und wachsen und schöner und schöner werden. Vielleicht ist es sogar eine Art der Meditation oder Therapie - nur du und dein kleines Projekt in deiner Hand. Ich finde mich dann und wann auch mal am innehalten und schaue mir mein Genähtes und und streichle es sogar. Tja, sieht so aus, als wäre ich ein Näh-Nerd :).


If you have done some EPP projects, this is not new to you, but if not, I will tell you roughly the steps of making EPP. If you are starting totally new, I would recommend hexies or pentagons, because here the angles are wider and easier to sew. The main focus of this post will be to find a pattern for an EPP project.


Wenn ihr schon ein paar EPP-Projekte gemacht habt, dann wird das nächste nicht neu, aber falls nicht, findet ihr hier die groben Schritte des EPP. Der Fokus dieses Posts liegt jedoch bei der Musterfindung für ein EPP-Projekt.


Templates/ Vorlagen
So if you know what pattern you are going to sew, you need the templates for the parts of your pattern. When I started my fist EPP-project, I used thicker paper and drew my templates on it and cut them out. This is not the way you should do it, only if you have very random shapes. That was before I saw any quilting books or the quilting-world-wide-web. Then I discovered, that you can buy paper templates as precuts which is a very comfortable, but maybe a bit expensive if your project is a bigger one. You can also use plastic templates which you can reuse a lot of times, but I have only seen them as hexies. I have to confess, that I never had a chance to try the plastic templates yet. I just print my templates on normal paper and cut them out. 


Wenn ihr wisst, was für ein Muster ihr nähen wollt, braucht ihr Vorlagen für eure Teile. Als ich mein erstes EPP-Projekt anfing zu nähen, hatte ich noch keine Ahnung, was sich für eine Welt im Internet zu diesem Thema verbirgt - geschweige denn wusste ich, dass das EPP ist, was ich mache. Ich habe meine Vorlagen selber aufgemalt und ausgeschnitten. So solltet ihr das nicht machen, außer ihr braucht ungewöhnliche Vorlagen. Dann habe ich entdeckt, dass man Vorlagen auch schon fertig geschnitten kaufen kann, was sehr bequem, aber auch recht teuer und unflexibel. Auch kann man Plastikvorlagen kaufen, die kann man immer wieder benutzen. Ich selbst habe diese aber noch nicht ausprobiert - hat sich nie ergeben. Ich drucke mir die Vorlagen einfach auf normalem Druckerpapier und schneide sie dann aus.


There are pros and cons for each of those methods and you have to find your own best way. I use only self printed paper templates, because they give me more flexibility in time and size, and it is much cheaper with the basting technique I use. I only glue my parts (next step). The precut templates made of paper are easy to use, but you cannot get all shapes in all sizes and you have to know what you exactly need. The plastic ones are great, if you make lots of projects and reuse those templates again and again, but you are fixed with your size and shape. 

If you want to print your own templates you can find them for example here on incompetech. You can vary the angles of triangles or diamonds on this page until you find the right template.


Es gibt für jede Methode Pros und Kontras und ihr werden euren eigenen besten Weg finden. Ich benutze nur selbst gedruckte Vorlagen, weil sie günstig sind, mir mehr Flexibilität in Bezug auf Zeit und Größe geben. Die Vorgeschnittenen Vorlagen sind extrem bequem, aber man kann nicht alle Formen in jeder Größe kaufen und man hat sie nicht immer sofort vorrätig. Die Plastikvorlagen sind genial, umweltfreundlich, weil man sie unzählige Male benutzen kann, aber auch für mich zu unflexible und zu wenig Auswahl in Größe und Form - man ist hier schon recht festgelegt.
Wenn ihr eure eigenen Vorlagen drucken wollt, könnt ihr Muster z.B. bei incompetech finden. hier kann man Form und Winkel verändern, bis man die richtige Vorlage gefunden hat.

Fabric Cutting/ Zuschneiden
So if you have your templates, it´s time to look for fabrics. EPP is predestined for fussy cutting, but of course fussy cutting is not necessary. If you like to fussy cut your parts, you should cut one of each template on a harder plastic so you can use them as master-templates. You can also make a frame while cutting your template out of a bigger piece of paper. This little Tula-Creature-Mugrug is an example of how to fussy cut. The head of the frog is made of two hexies, so I needed two motifs of the fabric to make this one head. Fussy cutting is a beautiful way of showing motifs, but it is also a fabric consuming way. Just beware and think before you cut into you precious fabrics ;-).


Wenn ihr die Vorlagen habt, wird´s Zeit nach Stoffen zu suchen. EPP ist hervorragend geeignet, um Motive aus Stoffen zu schneiden, aber ist natürlich nicht notwendig. Wenn ihr Motive ausschneiden wollt, könnt ihr entweder eine Vorlage aus härterem Plastik ausschneiden oder eine Vorlage basteln, bei der ihr genau die Größe der Vorlage in der Mitte ausschneidet - dann seht ihr das Motiv wie in einem Fenster. Motive sehen toll aus im EPP, sind aber auch eine stoffraubende Variante. Und immer schon vorsichtig, bevor ihr in Eure besonderen Stoffe schneidet :).


Just lay your plastic template on your fabric to find your right motif and cut it out - don´t forget the seam allowance.

Cutting the fabrics for EPP is done in very different ways by different people. Some people precut squares for hexies, triangles or diamonds, and some cut strips. I have to tell you that I am very sloppy with cutting fabrics for EPP. I always take more than 1/4 Inch for the seam allowance so it will not matter too much if my fabric is not always parallel to the template. I cut the fabric in my hand with scissors or with a rotary cutter on a mat (sometimes with a ruler). I just use what's handy.


Legt einfach die Plastik-Vorlage auf den Stoff, um das richtige Motiv zu finden und schneidet es aus - bloß nicht die Nahtzugabe vergessen.
Wie man den Stoff für EPP zuschneidet, ist Euch überlassen, es gibt so viele Wege. Einige bereiten erst Quadrate für Hexies, Dreiecke oder Rauten vor, andere schneiden lange Reihen. Da ich selten viele Teile von einem Stoff nutze, schneide ich meine Teile einzeln oder mit Stofflagen übereinander mit der Schere und dem Stoff in der Hand oder manchmal auch mit dem Rollschneider, wenn ich eine Matte da habe. Ich nutze das, was ich gerade dabei habe. Manchmal habe ich Stoffreste unterwegs dabei und dann sieht das wie auf dem unteren Bild aus :).

Wrapping the Fabric around the Template / Das Verpacken der Stoffe um die Vorlage
Now you have your templates and your fabrics cut. The next step is to wrap the fabric around your template. There are three methods to do so. Well, I have tried a fourth one with my first EPP Project, but that was because I didn't know better :). I pinned all six sides of the hexies with needles and so I was always pierced by the needles while sewing together. Of course this is nothing you should do. It hurts, I can tell you.

The easiest and quickest way of basting the fabric around the template is to glue it. This is the way I prefer, because this is the part of EPP I don´t like to much. Of course you can only use this method with paper templates and you have to buy the glue pen. I use the Sewline Fabric Glue Pen, but there are others too. You can remove the templates afterwords, but the templates cannot be used again.


Nun sind die Vorlagen und Stoffe geschnitten. Der nächste Schritt ist, die Vorlagen mit dem Stoff zu verpacken. Dafür kenne ich drei Methode. Nun, ich habe auch eine vierte ausprobiert, die ich aber nicht empfehlen würde. In meinem ersten Quilt vor meiner WEB-Quilt-Zeit habe ich meine Hexies mit Stecknadeln fixiert, das hat oft hier und da gepieckst :).
Die einfachste und schnellste Art (daher meine hihi)ist, den Stoff mit Kleber zu fixieren. Ich mag diesen Teil des EPP am wenigsten, daher ist das eine geniale Methode für mich. Hier könnte ihr die Vorlagen aus Papier meist nur einmal verwenden. Ich benutze den Sewline Fabric Glue Pen, aber es gibt auch andere Kleber. Später kann man die Vorlage gut vom Stoff mit der Hand ablösen.


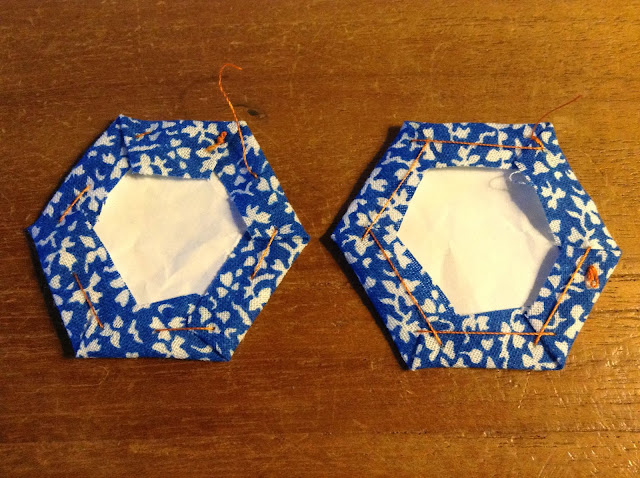
Another method is to sew through the fabric and paper template (see the two photos below on the left). Here you have to remove the thread before you can remove the templates. The last method is to sew only the corners of your folded fabric without going through the templates (see the photos below on the right). This is the only method you can use with plastic templates. The advantage of this method is that you can remove the templates without removing the thread.


Eine andere Methode ist, Stoff und Vorlage zusammen zu nähen. Der Faden wird ganz am Ende herausgezogen und somit kann dann auch die Vorlage entfernt werden (linkes Foto unten). Die letzte Variante wäre, den Faden nur an den Ecken zu kreuzen und nicht durch die Papiervorlage zu nähen. Der klare Vorteil hierbei ist, dass der Faden nicht entfernt werden muss und die Vorlage einfach so herausgezogen werden kann, ABER die ganze Sache ist daher auch deutlich unstabiler, wenn man den Faden nicht wirklich unter Spannung rundherum näht.


For all three methods, be careful not to pull the fabric so tight over the template edges that the paper bends or warps. You still need some space to sew the parts together. It can help to use clips to fix the folded fabric around the template - some recommend paper clips or Clover Wonder Clips. I haven´t used them yet, because I glue my parts.

Whatever method you use, you should fold the fabric always in the same direction around your template. This makes it easier to sew the parts together and to get neat points. This is very important, when you have pointed angles. In addition it looks nice from the back.


Bei allen drei Methoden sollte ihr aufpassen, den Stoff nicht all zu sehr unter Spannung zu setzen, da man immer noch ein wenig Stoff an den Kanten braucht, durch den man dann zwei Teile aneinander nähen soll. Es kann helfen, Clips zu verwenden, um den Stoff um die Vorlagen zu falten, ich habe solche noch nie benutzt, andere schwören drauf (z.B. Clover Wonder Clips).
Welche Methode auch immer ihr benutzt, solltet ihr Euren Stoff bei allen Teilen gleich um die Vorlage falten, damit die Teile sich schön ineinander fügen. Das gibt dann schöne Punkte beim Zusammentreffen der Teile. Außerdem sieht es von hinten toll aus.

It´s up to you, whether or not you finish basting all your parts before starting sewing the parts together. Usually that´s not me :). I prepare some parts and sew them together and start with the next parts. Let me show you some steps of my ferris wheel pillows.


Es liegt ganz bei euch, ob ihr alle Teile vorher fertig faltet oder Motiv für Motiv. Ich gehe meistens Stück für Stück vor, aber das hängt bei mir immer von Laune und Zeitdruck ab. Hier ein paar Schritte beim Entstehen meines Ferris Wheel Kissen.


Sewing the parts together / Zusammennähen der Teile
Now it´s time to sew your parts together. Take two parts together right side facing the right side at the seam you want them to sew together.


Nun ist es an der Zeit, die Teile zusammen zu nähen. Legt zwei Teile rechts auf rechts und näht sie an der oberen Kante mit kleinen und knappen Stichen zusammen.


When you sew your parts together, you have to note some things:

Use a colour for your thread that is the most unobtrusive - of course this depends on your fabric choice. If you have only dark fabrics you should use a dark thread. I use off-white colors with lighter projects and darker grey for darker projects. Of course you can change the color of the thread for every seam.

Cotton, polyester or silk? This is a philosophy and I will not solve this question. I use polyester for my EPP, because I think it´s stronger. Some say silk goes better through the fabric, while others only use cotton.

Avoid knots and stitch some stitches at the same place for fixing the thread at the start and do so from time to time and at the end of a seam line. Start the same way at the next template.

Use a thin needle.

Sew small stitches (there are different methods to sew the seams).

Don´t sew through the paper templates when joining the parts. If you do, your stitches will be to big once the paper is removed and you will see them later on the right side. It also makes the templates harder to remove.

Corrections: If you see that your next template will not fit in neatly, you can manipulate it if you have paper templates. Just pull or push or fold the fabric in the right direction. Of course you can only manipulate differences up to 1/8 inch or a little more.

Here you can see the one stitch I made bigger for you with orange thread.


Wenn ihr Teile zusammen näht, gibt es ein paar Punkte zum Klären:
Nehme beim Faden eine Farbe, die am unauffälligsten ist - hängt natürlich von eurem Stoff ab. Ich benutze meist sandfarbigen Faden, von weiß habe ich mich fast gänzlich verabschiede - zu leuchtend für mich. Natürlich könnt ihr auch für jede Naht die Farbe des Fadens wechseln.
Baumwolle, Polyester oder Seide? Das ist dann wohl eher eine philosophische Frage, die ich nicht werde beantworten können. Ich benutze Polyester beim EPP, weil ich für mich denke, es ist am stärksten. Manche sagen, Seide geht besser durch den Stoff, andere sie nähen nur mit natürlichen Fäden und nutzen Baumwolle.
Versucht Knoten zu vermeiden und näht einfach ein paar Stiche an der selben Stelle, um den Faden zu festigen. Das solltet ihr eh von Zeit zu Zeit auch auf einer geraden Naht machen, Kommt ihr zum nächsten Teil mit dem gleichen Faden, solltet ihr ihn hier auch mit ein paar Stichen an der gleichen Stelle fixieren.
Benutzt eine dünne Nadel.
Näht kleine Stiche (es gibt unterschiedliche Methoden, wie man die Teile zusammen nähen kann, darauf gehe ich hier aber nicht ein).
Näht nicht durch das Papier - dann sind die Stiche eindeutig zu groß und das Entfernen der Vorlagen wird schwieriger.
Anpassungen: Wenn ihr seht, dass euer nächstes Teil nicht ganz ans andere passt, könnt ihr beim EPP ein wenig ziehen und schieben. Die Abweichungen sollten nicht riesig sein (nicht viel mehr als 1/8 Inch).
Auf dem Bild unten könnt ihr genau erkennen, wo ich einen Stich zu groß gesetzt habe.

Putting the parts together / Zusammensetzen der Teile
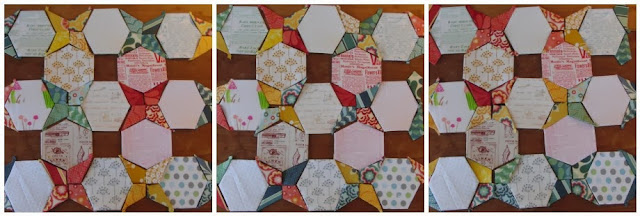
There are also different ways to put your parts together. You can finish one motif (e.g. a flower) after the other and then bring them together at the end or you can sew one motif to the next and see your project growing. Some sew EPP in lines and some sew it in motifs. Just find your way. It depends on my mood and the time I have for a project. If I have enough time I sew in motifs. If it has to be quicker, I sew in lines. Sewing in lines will be faster, but sewing in motifs satisfies me most.


Hier gibt es wie immer auch unterschiedliche Wege, die Teile zusammenzusetzen. Ihr könnt ein Motiv nach dem anderen fertig nähen und das ganze am Ende zusammenbauen, oder in Reihen oder Runden. Ich bin eher eine Motiv-Näherin, aber wenn  ich keine Zeit habe, dann näh ich auch mal in Reihen, das geht wesentlich schneller.


Removing Templates / Entfernen der Vorlagen
The templates will be removed only when the parts are surrounded by other parts, or when you have finished the whole project. I remove only some parts and iron them before removing the next ones so the seams are fixed neatly.


Die Vorlagen solltet ihr bei großen Projekten so spät wie möglich entfernen und auch erst, wenn das Teil komplett umgeben ist von anderen Teilen. bei kleineren Projekten wie Kissen, solltet ihr die Vorlagen erst am Ende entfernen. Ich bügle das Projekt immer an den Stellen, wo ich danach die Vorlage entfernen will und im Anschluss nochmal, damit die Nähte auch wirklich dort bleiben, wo sie hingehören.


Quilting / Quilten
Now to quilt your Project. I prefer to quilt my EPP´s because I am afraid that a seam could open. This has never actually happened to me but I am very careful. You should avoid quilting in the seams with EPP. When I make pillows from EPP I always use fusible interface to fix it all. And I wash my EPP´s only by hand.


Nun ans Quilten. Ich quilte meine EPP-Projekte immer, weil ich einfach Angst habe, dass sich doch Nähte öffnen könnten. Das ist bisher noch nie passiert, aber ich bin da übervorsichtig. Ihr sollte vermeiden, in den Nähten zu quilten. Bei Kissen benutze ich sogar Vliseline mit einer Klebefläche, um meine teile vollends zu fixieren. Außerdem wasche ich meine EPP´nur mit der Hand.


Tutorials for Sewing EPP / Anleisungen zum Nähen von EPP
You can find lots of tutorials for all the steps of EPP and this tutorial should only show you a quick overview.  Now lets start finding our EPP-Pattern for the next Project. I promise you, if you go through your everyday life you will see so many EPP-Patterns. Get inspired by your flickr and internet friends. My daughter used to go to a Painting Artist School and they had a great teacher and that´s her philosophy: copy or cloning doesn't exist, you only get inspired by the work of others.


Ihr könnt unglaublich viele tolle Anleitungen zum Nähen nach der EPP-Methode im Netz finden, wo Euch diese Schritte nochmal viel ausführlicher erklärt werden. Aber nun auf zum Suchen nach dem geeigneten Muster für euer Projekt und zu eigentlichen Thema dieses Posts. ich versprechen euch, wenn ihr durch euer alltägliches Leben geht und die Augen aufhaltet, dann werdet ihr mit EPP Mustern überschüttet. Last euch inspirieren bei Flickr und euren Internetfreunden. Meine Tochter war mal in einer Malschule und sie hatte echt eine tolle Lehrerin. Ihre Philosophie war ganz klar: Nichts ist kopiert, du bist einfach nur von anderen inspiriert worden.


The floor of a shop.
And to tell the truth, you see so many beautiful and stunning projects in the internet, that your brain is full of all these impressions so that you cannot always distinguish or remember where you saw each idea....... Just go for it! Of course it is nice to mention the person who inspired you if you can remember.

There are lots of books showing you how to make EPP - two of them I would love to introduce to you:


Und um ganz ehrlich zu sein: Es gibt so viele schöne Projekte im Internet, dass unser Hirn voll ist mit Eindrücken, so dass wir uns nicht wirklich immer erinnern können, woher unser Eindruck kommt und wo wir die Idee für ein neues Projekt her haben... Einfach machen! Natürlich ist es schön, wenn man die Quelle seiner Inspiration kennt, sie auch anzugeben.
Es gibt außerdem viele schöne Bücher zum Thema EPP - zwei davon möchte ich euch gern zeigen:
 

The one of them is from Hilde Klatt and Liesel Niesner called "Liesels Sechsecken-Technik". Ok, you will say: now it is crazy recommending to us a book in German, but there are so many useful pictures it might be helpful, even if you don´t understand the text. Have a look in this book:


Das eine ist von Hilde Klatt und Liesel Niesner, "Liesels Sechsecken-Technik". Das ist eine wahre Quelle der Inspiration:

And the other book is the one from Tacha Bruecher called "hexa go-go". She is a quilt friend of mine living in the same city as I do and an absolute EPP maniac. Her book is lovely and she gives lots of tips sewing hexies.


Und das andere ist von Tacha Bruecher: "hexa go-go". Sie ist eine Quilt-Freundin von mir und lebt in der gleichen Stadt wie ich und ist ein absoluter EPP-Maniac. Ihr Buch ist echt schön und gibt eine Menge Tipps zum Nähen von Hexies.


Shapes for EPP / Formen für EPP
To show you the range of shapes you usually use in EPP, I put them together for you. So this is nothing new, it's geometry and it's a good reason to listen to maths in school, that´s what I tell my daughter ;-). Be aware as I don´t want confuse you. On the next picture you see all shapes being in a 6 pointed diamond. You always use the same side length or a multiple of it. In my drawings you will find (0.5), 1, and 2 inches. All the drawings are made on prints from  incompetech.


Hier habe ich Euch mal auf einem Blatt die gängigen Formen des EPP aufgezeichnet. Es ist nichts Neues, einfach Geometrie und ein guter Grund, in der Schule in Mathe aufzupassen, das sage ich auf jeden Fall immer meiner Tochter ;-). Ich hoffe, ich verwirre Euch hiermit nicht. Ihr seht auf dem Bild alle Formen, die in einem 60°-Diamanten stecken. Man nutzt immer die gleichen Seitenlänge oder ein Vielfaches davon. In meiner Zeichnung habe ich 0,5, 1 und 2 Inchen Seitenlöngen. Alle meine Zeichnungen basieren auf Ausdrucken von  incompetech.


For making an equilateral pentagon you need a compass and a set square.

Um ein gleichseitiges Fünfeck zu zeichen, braucht ihr einen Zirkel und ein Geodreieck.


With these shapes you can make lots of patterns.

This is my recent EPP-long-term-proect: My Flower Garden. The connecting fabric will be grey and there will be all kinds of flower shapes to become an irregular flower garden.


Mit diesen Formen könnt ihr schon eine Vielzahl von Mustern generieren.
Unten auf dem Bild seht ihr mein aktuelles EPP-Langzeit-Projekt: Mein Blumengarten. Der Stoff zwischen allen Blumen ist ein hellen grau und es wird die unterschiedlichsten Blumenformen haben.


Here you can see the shapes I used:


Hier könnt ihr genau sehen, welche Formen hier drinstecken:


My latest EPP Project was a pillow for Swappen auf Deutsch 3. I saw this cover of a book and I knew I wanted to make it with fabric.


Mein letzten EPP-Projekt war das Kissen für Swappen auf Deutsch 3. Ich hatte dieses CD-Cover gesehen und wusste, dass muss ich mal mit Stoff machen.


First I had to find my motif, because this pictures gives you so many possibilities. In this case it is easier to copy it in back and white, so the origin colours will not influence you so much.


Erst musste ich das richtige Motiv suchen, denn das Bild gibt einem unglaublich viele Möglichkeiten. Hier ist es leichter, sich das ganze schwarz-weiß auszudrucken, da die Originalfarben zu sehr beeinflussen.

Then I had to think about the templates I needed here. These are not the usual 6  (60°) or 8 (40°) Point Diamonds. 5 Point Diamonds have an angle of 72° and you cannot find them easily to buy as precuts, but you can find them on incompetec, where you can vary the angle. Also I needed 10 Point Diamonds with 36°. I can tell you, this is a project I really had to pull and fold my shapes because it isn´t that easy to get so many points together with different angles. 


Dann musste ich über die Vorlagen nachdenken, die ich brauchte. Normalerweise benutz man ja 60°- oder 40°-Rauten (6 oder 8 in einem Kreis), aber hier sind es 5 in einem Kreis = 360°: 5 = 72°. Außerdem braucht ich dann auch noch 10 in einem Kreis (36°). Ich kann euch sagen, dass ich hier schon gezogen und geschoben habe, damit die Punkte schön aufeinander treffen, weil hier auch Teile mit unterschiedlichen Winkeln aufeinander treffen.

Doesn't this look cosy? Sitting on the sofa covered with lovely quilts doing some EPP - that´s magic ;-).

Funny, but my pillow for Swappen auf Deutsch 2 was also a EPP pillow. I sat at the table and started to draw an pattern. Later I realized, that I must have been inspired by a picture taken by Brioni-flossyblossy I saw on flickr, but I really had forgotten it. That´s why my pattern was totally EPP and hers was EPP appliquéd on fabric.

As you can see my hexies here are not real hexies with equalateral sides. That´s a problem with drawing on squared paper. You will move your pen on lines or going from one corner to the other and that brings different shapes as if you make your pattern for example on hexie paper. 

In this case I drew my master templates on squared paper while increasing my layout in the size I wished and copied the master template. As you can see I had really pointed angles which is not a real beginner project. But if you know me a bit, you know that I am not afraid of anything in piecing. What´s the worst could happen? It doesn't work - so what? So you try again or leave it, that´s it. Nobody is going to laugh at you or even punish you. It´s my quality time and I decide what to do with it. It´s not failure, just the braveness, that I tried it!


Sieht das nicht gemütlich aus? Auf dem Sofa sitzend, zugedeckt mit tollen Quilts ein wenig EPP nähen - das ist für mich magisch und extrem erholsam ;-).
Witzig, aber mein Kissen für Swappen auf Deutsch 2 war auch ein EPP-Kissen. Ich habe am Tisch gesessen und angefangen auf kariertem Papier zu zeichnen. Später realisierte ich, dass ich von einem Bild von Brioni-flossyblossy inspieriert war, hatte das aber schon längst wieder vergessen. Daher ist mein Kissen auch komlpett EPP, während sie mit Lücken ihr Teil appliziert hat. Hier kann man auch erkennen, dass meine Hexies keine gleichen Seitenlängen haben. Das wird auf kariertem Papier auch schwierig. Für richtige gleichseitige Hexies sollte man sich immer Hexie-Druckvorlagen ausdrucken und auf ihnen experimentieren. Im meinem Fall habe ich mein kleines Muster auf Karopapier vergrößert und die Teile dann als Vorlagen für EPP genutzt. Das ist kein wirkliches Anfängerprojekt. Hexies eignen sich hervorragend für Erstlingsprojekte, da sie keine zu spitzen Winkel haben. Traut euch ran. Wer mich kennt, weiß. dass ich keine Angst habe, Neues zu probieren. Was ist das Schlimmste, was passieren kann? Es wird nix! Na und? Wer soll euch bestrafen oder gar auslachen? Kein Versagen, es ist mutig, dass ihr es versucht habt!

Here are some other drawings of mine. Maybe I will make them into quilts or pillows some time. Feel free to get inspired ;-).


Hier noch ein paar Zeichnungen von mir. Vielleicht werde ich mal ein Quilt oder Kissen danach nähen. Fühlt euch frei, inspiriert zu werden ;-).


So dear readers of this post, if you really got to this point you made me so happy - thank you for staying tuned. Maybe I can see some of your EPP projects soon - even if you already started, this might be the reason to go on and finish it. Maybe I see you in my new EPP-QAL, and you are invited to come and join!

Here more of of my EPP finishes...


So meine lieben Leser/Innen diese Posts. Wenn ihr es echt bis hierin geschafft habt, macht ihr mich super glücklich - vielen herzlichen Dank, dass ihr durchgehalten habt. Vielleicht sehe ich euch ja bald mit eurem EPP-Projekt in meinem neuen QAL, ihr seit herzlich eingeladen mit uns neue Projekte zu starten oder alte fertig zu stellen!


Thanks
Aylin